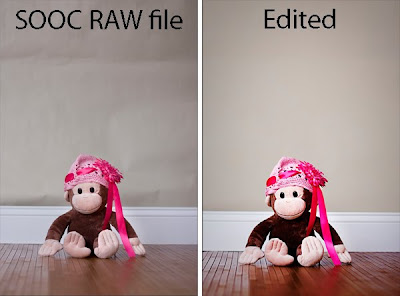
Learning photoshop is one of the best things any photgrapher can do. You can take your photos from good to great. Here is an example of a photo I shot in RAW and enahanced in Photoshop (before and after:)
I shoot in RAW. That basically means a digital negative that only DSLR can take. Point and shoot cameras will only shoot in JPEG. When shooting in JPEG format, the camera makes all the editing decisions for you. It color corrects and sharpens. I also shoot in manual mode, having complete control of all my settings and exposure, depth of field, shutter speed and ISO. I don't let the camera make any decisions for me! That is exactly why I shoot in RAW format. I want to decide to how to edit my photos myself. When shooting in RAW the pictures come SOOC (Straight Out Of Camera) flat, washed out, unsharp and a bit noisey. Sounds bad right? No, because I can then enahnce the photo and fix all those things to my liking, instead of what the camera thinks is correct.
Anyhow, here's what I did to edit this photo of my most willing subject, Curious George...
This picture was taking in my fake studio setting. A baseboard from Home Depot, a roll out bamboo wood rug and a piece of seamless background paper to look like a home setting. The advantage of this is that I can bring it anywhere with me and move it anywhere I like to get the best use of natural light coming in through a window. I used my big bay window in my living room for this. The set up is at about a 45 degree angle to the window.
I opended the photo in Adobe Camera Raw, where I auto corrected the white balance and exposure. Then I brought it into Photoshop where I ran noiseware (plug in that cleans up any noise in photos). Then I sharpened it by duplicating the background layer and running a high pass. Then I changed the layer from normal mode to soft light. Next, I flatteded the image.
The smooth out the background, I used the quick slection tool to select George and move him to his own layer. Doing this protects him from any adjustments I make. Then I duplicated the background layer. Working on this layer, I used the eye dropper tool to select a sample of the background color. Then I used a large soft brush to smooth out the background. So much better!
To enhance the colors I did a curves adjeustment layer which popped the colors. Then I added a slight vignette. And done :)


